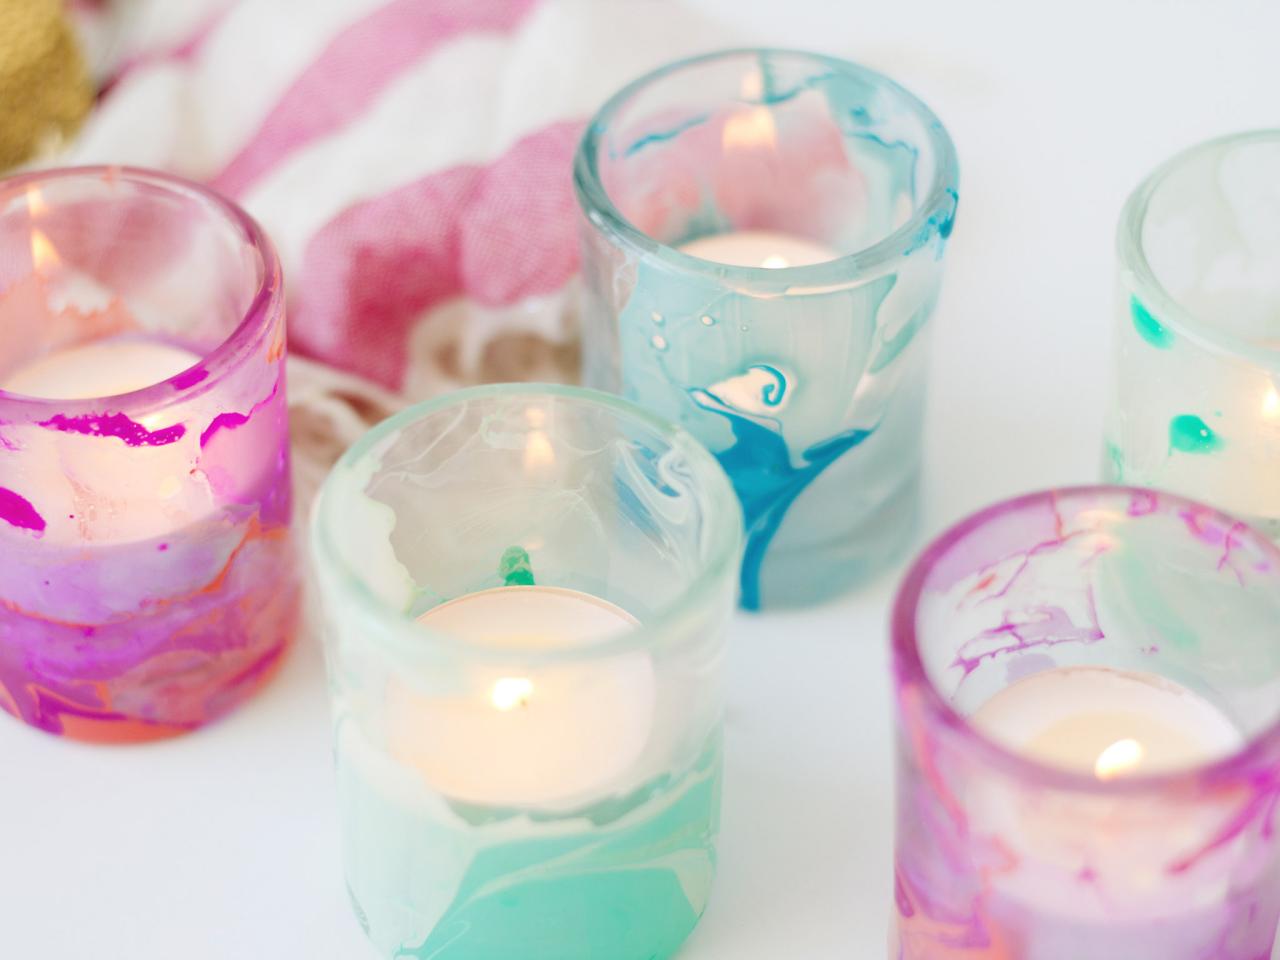
Use Nail Polish to Create Marbled Votives

This simple and quick technique will have you wanting to marble everything you own! Combine a few drops of nail polish with water to create these colorful candleholders, just in time for your summer celebrations.

Original_Chelsea-Costa-Marbled-Votives-Beauty-9_h

By: Chelsea Costa

Related To:

Materials Needed

clear glass votive cups
nail polish
container with water
toothpicks
nail polish remover
cotton balls
clear spray sealant (optional)

Prep the Water

Fill a container half full with water. The marbling will work best with water that’s just slightly warmer than room temperature.

Mix Your Colors

This part needs to happen quickly, so that the nail polish doesn’t have time to dry. Beginning with your first color, let a few drops of polish fall onto the water. Tip: Apply them near the water’s surface; if you let them fall from too high they’ll sink to the bottom. The polish will start spreading once it hits the water. After you have a few drops of the first color, add a second and it will spread a bit as well.

Swirl It

Quickly and gently drag a toothpick across the surface of the water to swirl the colors and create a marbled effect. These last two steps shouldn’t take much more than a minute or so.

Dip Votive

With the votive held sideways, gently dip and roll the surface across the nail polish on the water. The polish will pull off of the water and stick to the votive. Roll the votive until all sides are covered. If you’d like marbling on the bottom as well, dip the bottom into the water to pick up more nail polish. Set the votive upside down to dry.

Let It Cure

The nail polish will dry quickly, but allow at least an hour before you handle them so that the nail polish has time to cure. Use the nail polish remover and a cotton ball to remove any smudges.

If desired, take to a well-ventilated area and spray with a clear sealant to protect the marbling.

Just Add Candles

Fill your marbled candleholders with candles and enjoy!

Next Up

How to Make a Modern Textured Vase

Skip expensive porcelain vases — create your own with a few scraps of lace, inexpensive hurricane vases and white paint. Filled with summer wildflowers, these vases add a modern touch to any home.

Make Your Own Boho-Chic Rope Tassel Keychain

Break out the embroidery thread from your summer camp days, and instantly upgrade your keys, bottle-openers, bags and more with this super-simple and trendy tassel keychain.

Make Your Own Watercolor Note Cards

Bring the look of blooming springtime flowers inside with beautiful watercolor paintings to use as wall art or greeting cards.

How to Make a Tassel Camera Strap

Personalize your camera with a cotton strap embellished with metallic leather and craft paint.

Make an Indigo-Dyed Market Tote

Hit the farmers’ market in style with a cool, custom tote. These indigo-dyed tote bags make for endless possibilities of pattern and style, so grab your materials and make one for everybody you know!

Make Your Own Custom Fabric Canvas Art

Bring the oversized floral trend into your home by creating a bold and custom piece of art. Our giant floral canvas print is definitely a statement piece perfect for that big, empty wall.

How to Make Citronella Candles

Keep mosquitoes away this summer with easy, homemade citronella candles.

How to Make Negative-Space String Art

Most string art creates a picture or shape; this technique does the opposite by outlining a silhouette instead. Try this easy and inexpensive craft to add a punch of personality to your walls.

How To Use Tea and Cinnamon to Age Artwork for Halloween

Brew some tea, snag this free, printable Halloween art and make your own aged wall art in minutes.

How to Start Using Your Cutting Machine

If you’re afraid to take your new cutting machine out of the box, you’re not alone. Even Dennis Setteducati and Andrew Boza — The Crafty Lumberjacks — were afraid to use their new machine at first. Learn how to become a cutting machine pro with our beginner's guide for Cricut, Silhouette and other popular brands, then get step-by-step tutorials for making a sticker and an iron-on.

What's New in Handmade

Follow Us Everywhere

Join the party! Don't miss HGTV in your favorite social media feeds.