


How to Add Wood Paneling to Your Walls With Balsa Wood

According to design expert Jonathan Fong, wood paneling has a natural warmth and richness that makes you feel instantly comfortable and at home. However, this isn't a look back to the era of 1970s wood paneled walls--Jonathan's wood wall project uses lightweight balsa wood, which is available in arts and crafts stores, as well as model airplane shops. Not only is the material easy to work with it also stains beautifully. When arranged in a simple grid-like pattern it takes on a contemporary craftsman look that's both masculine and elegant. If you don't have the time to create the look across an entire wall, Jonathan says it would also make a great headboard.
Materials and Tools:
balsa wood sheets, 1/32-inch thickness
cutting mat
double-stick mounting tape
drop cloth or plastic sheet
5 all-purpose paint brushes, 3 inches wide
general purpose leather work gloves
laser level
pencil
rubber gloves
straightedge
steel wool (grade "000")
tack cloth
wood conditioner
wood stain and sealer in one, 4 shades
craft knife
Steps:
1. To achieve this look you'll first need to create a diagram on paper and decide what size panels you want to use and how much wall space you want to cover. Decide if you want to use the two easy-to-work-with sizes that balsa wood comes in--1x2 feet and 1x3 feet, or if you want to work with a third size (which is accomplished by cutting the 1x2-foot sheets in half). For variety, three sizes of balsa are used in this project; 1x1 feet, 1x2 feet and 1x3 feet. Once you've decided which sizes of balsa wood panels you'd like to use, you can map out how you want the panels layed on the wall by either drawing a schematic design using a computer program, or by hand.

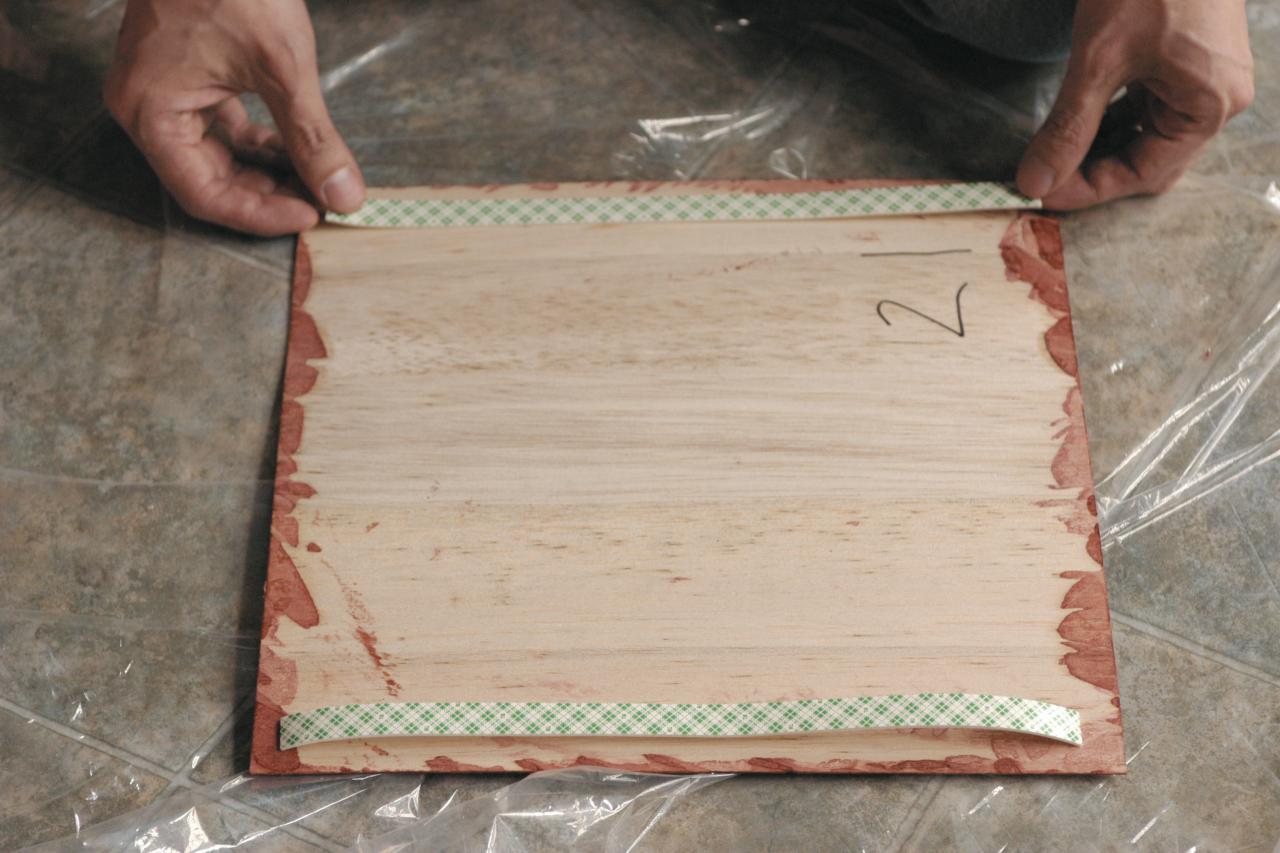
2. Number each box in the diagram, going from bottom to top; you'll use these numbers as a reference for later. The total number of boxes also tells you how many panels you should buy. (Get a few extra, just in case.)
3. To make 1x1-foot pieces, 1x2-foot pieces need to be cut in half. To do this, place the panel on a cutting mat, line up the straightedge, and slice. The balsa wood is so thin, it cuts without any effort. For extra safety, wear a glove on the hand holding the straightedge.

4. On the back of each piece of wood, write the number that corresponds to the number you've assigned it in the diagram. This way you'll know how the pieces fit together on the walls, even if the panels get separated.
5. Place a drop cloth (or plastic sheet) on the floor. Using a tack cloth, wipe each piece of wood to remove all dust. If you've never used one before, a tack cloth is a sticky cloth that you'll find in the paint department of the hardware store.

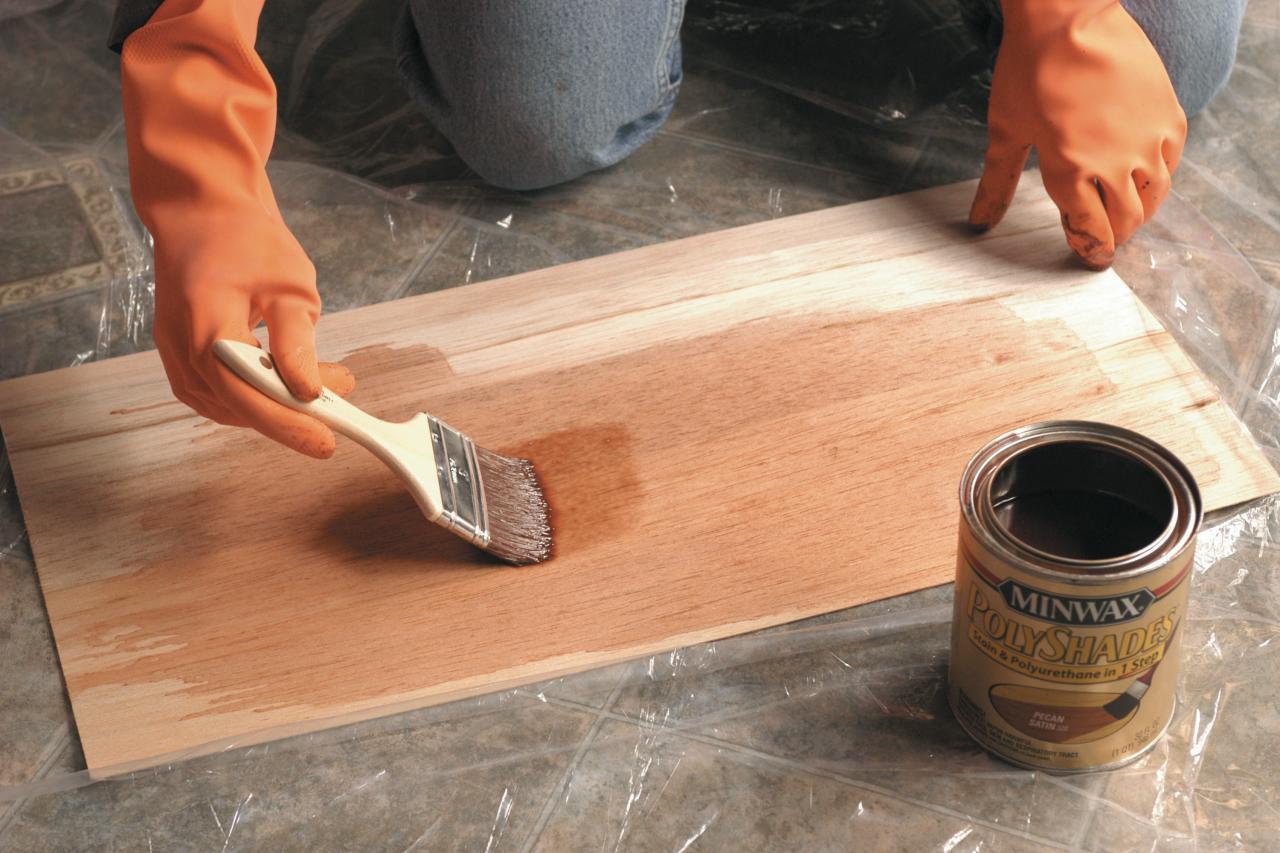
5. Because balsa wood is so soft, it doesn't accept wood stain as easily and evenly as hard woods do, but applying a coat of wood conditioner solves this problem. Using a three-inch brush, paint the conditioner on each balsa panel. It absorbs instantaneously and dries in less than fifteen minutes. You may be tempted to skip this step, however, without it, your stain will go on blotchy, and you may end up using more stain in the long run to cover the uneven spots.
6. On the schematic diagram that you've already created, assign stain colors to each panel so you can plan ahead how you're distributing the various colors. In this project, four different stain colors are used to create a beautiful montage of woods: honey pine, pecan, Bombay mahogany and natural cherry, all in a satin finish. Use a product that combines stain and polyurethane in one so you don't need to apply a sealer in a separate step.
7. Put on your rubber gloves, open your four cans of stain and brush on a coat of color using the diagram as your guide. Assemble all the panels that correspond to a particular finish and stain those at the same time. After one coat, the wood already looks glorious but it will take a second coat to give each panel a satin glow.

8. Wait at least six hours for the first coat to dry completely. Then apply the second coat and wait another six hours for that coat to dry. You'll want to work in a ventilated garage or carport.

9. Before putting your wood panels on the wall, buff each panel with an extra-fine grade of steel wood (grade "000" or higher) to smooth out any uneven sections. If it looks like the finish is uniform throughout, you can skip this step.
10. On the back of each piece of wood, place a strip of tape on the left and right sides. It's not necessary to line both sides the entire length of the board, however, if a particular panel happens to be warped, a long piece of tape will help keep it from jutting out from the wall. If the panel lies flat, all you will actually need is a one-inch piece on each corner, plus a one-inch piece on each of the sides.

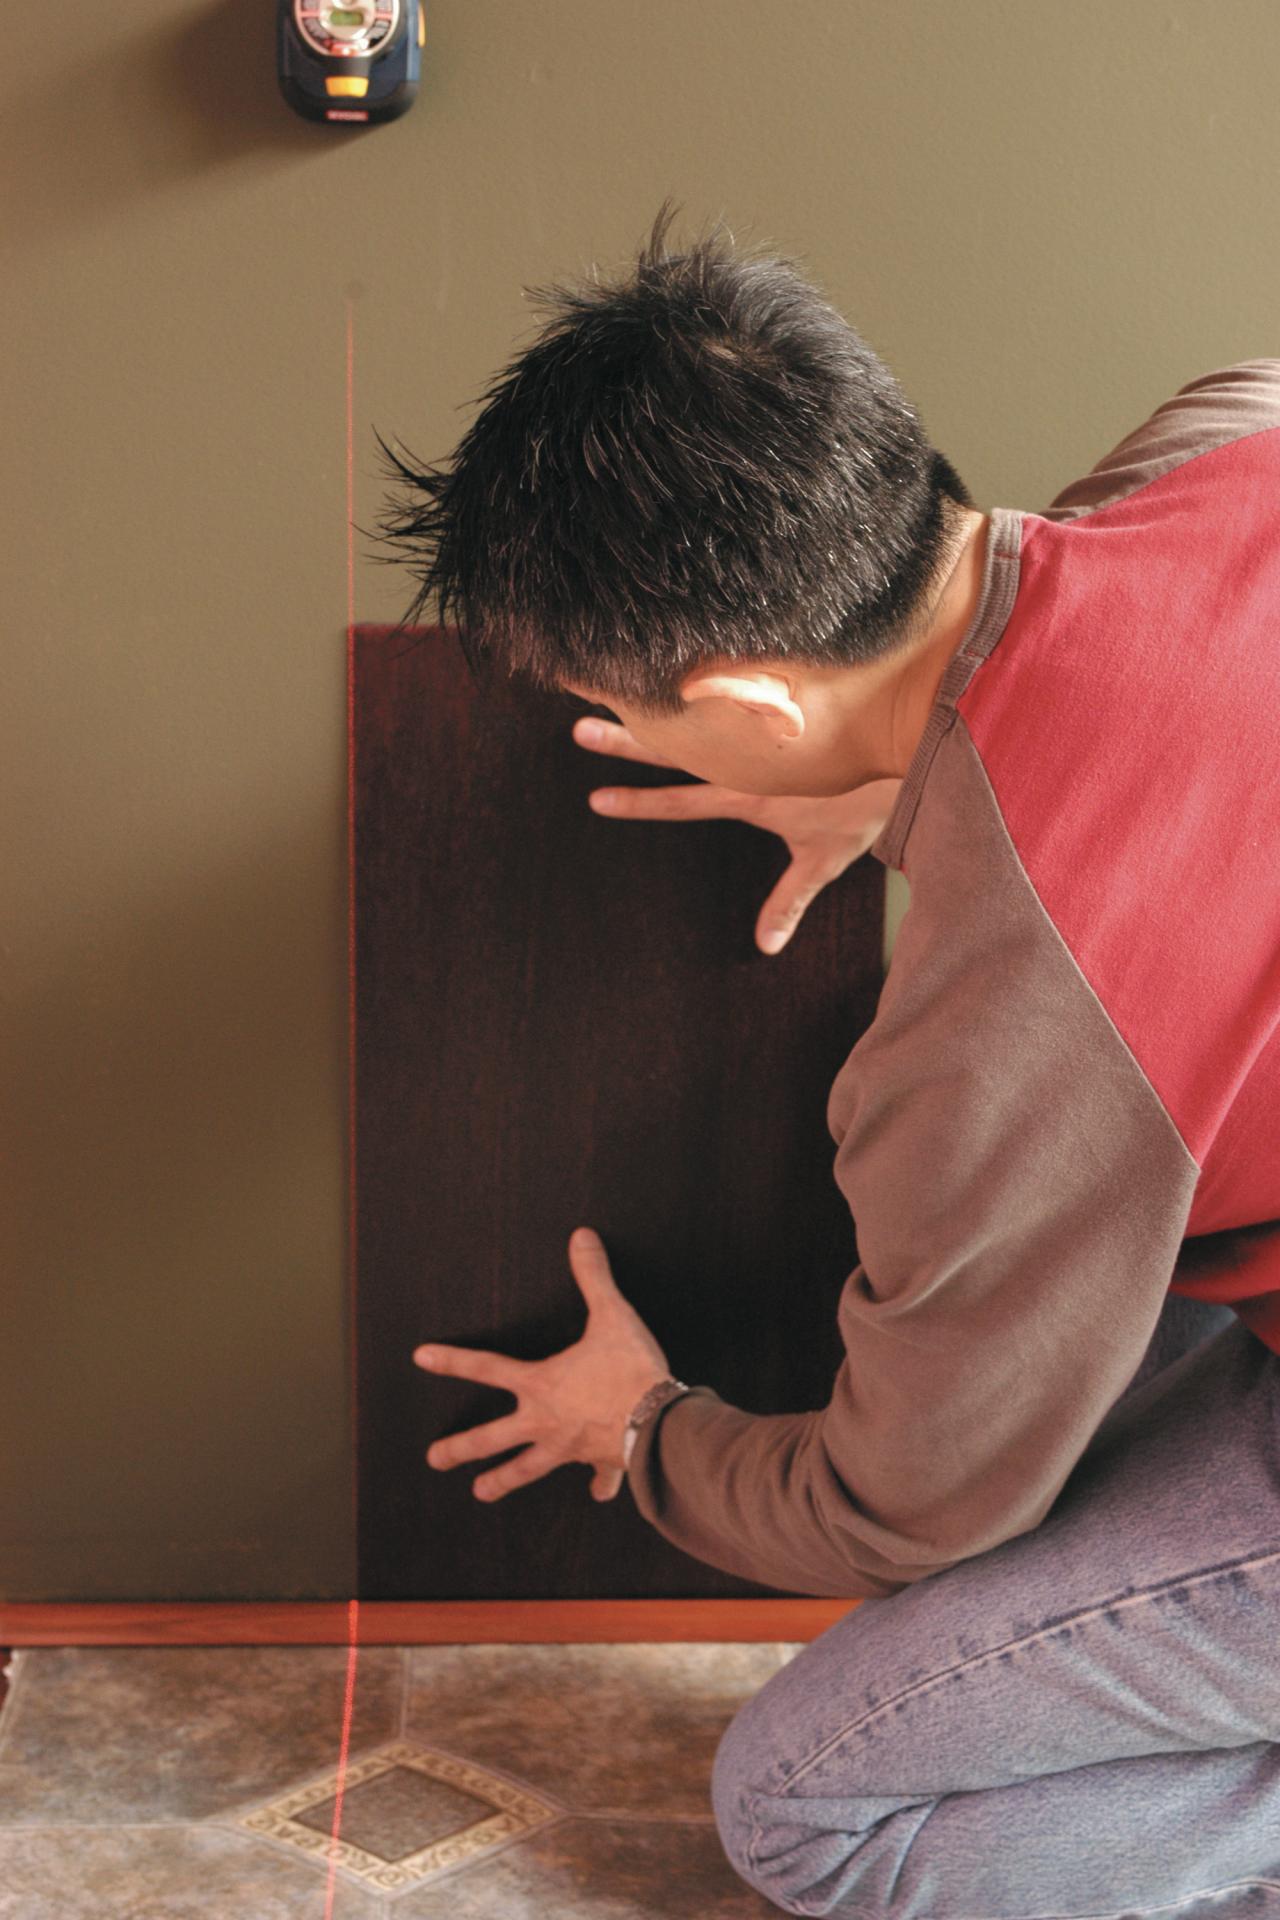
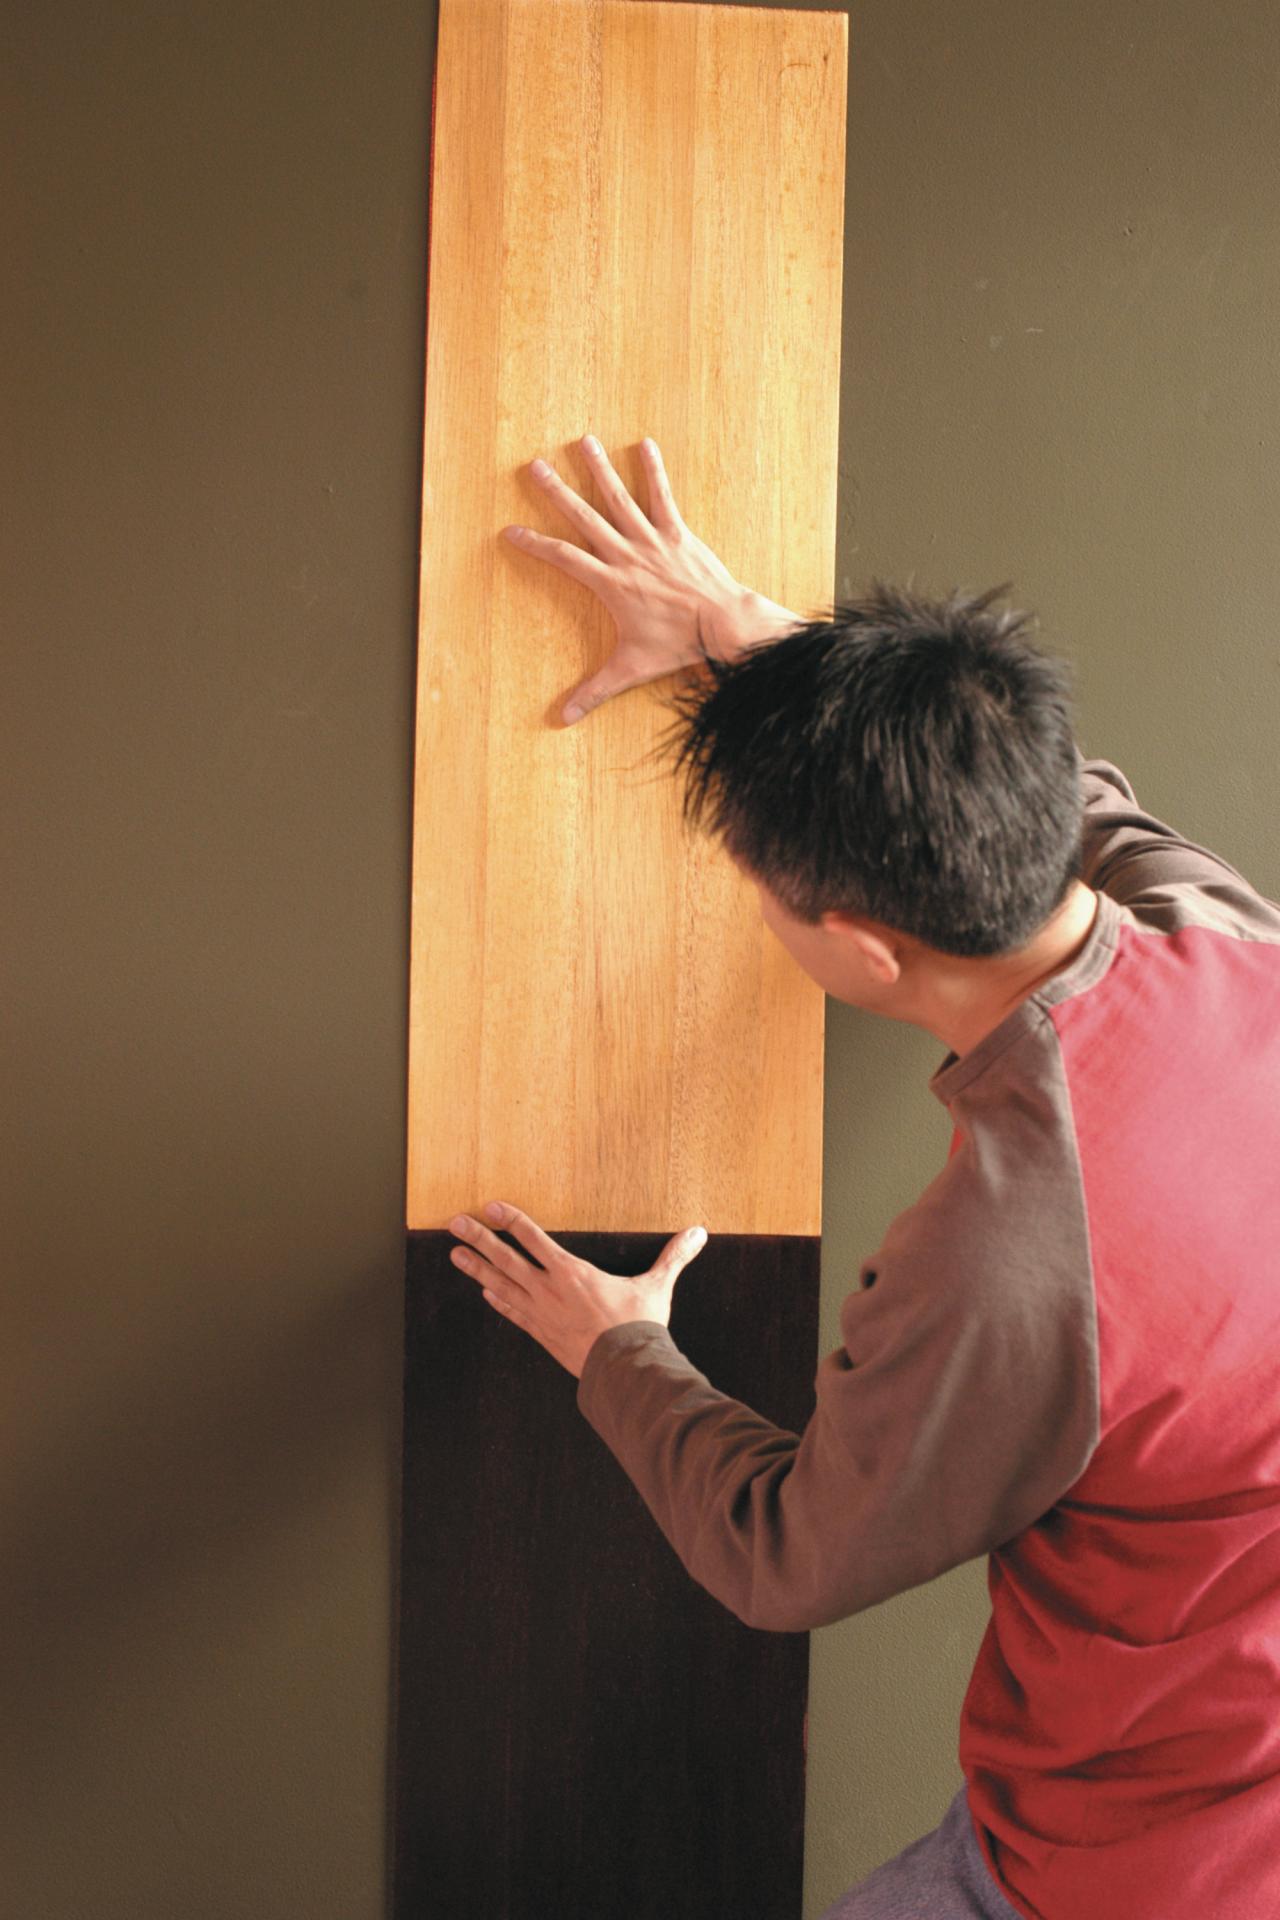
11. Starting at the bottom, tuck your first wood panel between the molding and the wall if there is a big enough gap to squeeze it in, and press the panel where the double-stick tape touches the wall. If it won't fit behind the molding, just place the bottom edge of the panel flush up against the top edge of the molding. Make sure you use a laser level to line up the panel straight.
Hint: If you need to remove any of the wood panels, be very careful because the balsa wood is so thin. If you pull it away from the wall, the wood will crack. Instead, take a long putty knife and wedge it underneath the wood and double-stick tape to pry it loose. You should do this if you ever take down the entire wall treatment so you can the panels to reuse elsewhere.
12. Start moving up the row. To do this, after the bottom panel is attached, you can use it as a guide by resting the next one on top of it and then pressing down on the double-stick tape. After you've finished one vertical row, go to the next row and start at the bottom again. Use your laser level to make sure you're not veering off at an angle. You'll get into a good rhythm here, especially if you have someone help you peel the double-stick tape.
As you're applying the wood to the wall, don't worry if the panels aren't completely flush. If your wall is a dark color you won't even see the gaps. Another thing you can do is to overlap the panels to get rid of the gaps. The wood is thin enough so that you'll hardly notice the overlap.
Nothing maintains this wall treatment better than a tack cloth. Keep your cloth in the plastic wrapper so it remains sticky, and periodically wipe the wood with it. For tougher stains, a damp cloth will clean the wood without harming it since you've sealed the wood with polyurethane.
Adapted from Walls that Wow by Jonathan Fong. Published by Watson-Guptill Publications, a division of VNU Business Media. Reprinted with permission.


