


5 Easy DIY Clocks You Can Make in No Time
See how you can turn household items — like a placemat, wood tray, plate, tile — into a combination artwork/timepiece — all for little time and little money.

Clocks make a great addition to any decor style. It’s not always easy to get just the right thing, but with a little ingenuity you’ll soon see that just about anything can be made into a clock. There are clock mechanisms available through craft stores and on the web in a variety of sizes. Furthermore, you can now find them in a variety of styles to meet your design objective. Consider looking at discount stores and thrift stores for clock parts. You will often find a clock that might not be what you want but has really interesting hands. Most of them are quite easy to disassemble but inspect it before you buy.
1. Wood Serving Platter With Belt

Materials Needed:
- wood serving platter
- newsprint or craft paper
- pencil
- scissors
- thin belt
- nailhead trim upholstery tacks
- hammer
- drill and bit to match clock mechanism shaft
- clock mechanism
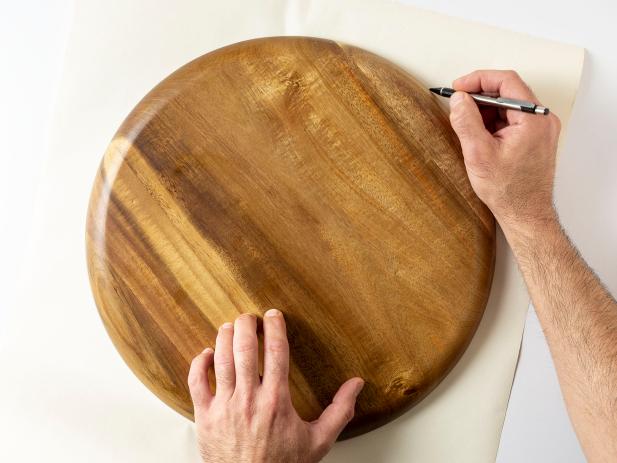
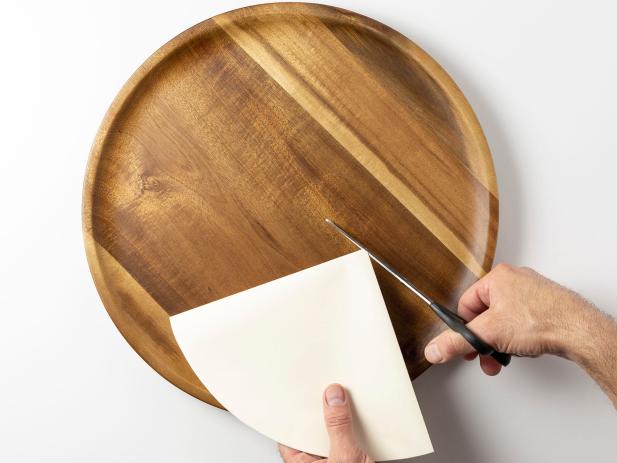
Find the Centerpoint: Trace a circle around the platter on newsprint or craft paper (Image 1). Cut out the circle using scissors then fold it in half. Then fold it in half again, creating a quarter circle. Snip the point off of the quarter with scissors and open the circle (Image 2). Line the circle up on the back of the platter evenly and make a dot in the center hole.

Drill: Drill a hole at the mark using a bit that is at least as big as the shaft of the clock mechanism you will be using.

Add a Way to Hang It: Before you attach the belt hanger you will need to decide if you want the buckle to be present or not. If so, fasten the buckle and then cut the belt in a place that will allow the buckle to be on one side or the other, but not at the top. If you don't want the buckle simply cut off the buckle and cut the opposite end to make it a straight line, if necessary. Place the ends of the belt on the side of the platter at about midpoint. Secure the belt to the sides of the platter with nailhead trim upholstery tacks and a hammer.

Install Clock Mechanism: Insert the clock mechanism through the back of the platter and add the hands to the front. Hang the clock on the wall using the belt hanger.

2. Nautical Wood Disk

Materials Needed:
- 1/2" birch project disk
- newsprint or craft paper
- pencil
- scissors
- masking tape
- utility knife
- spray paint
- drill and bit to match clock mechanism shaft
- clock mechanism

Find the Centerpoint: Trace a circle around the disk on a piece of newsprint or craft paper. Cut out the circle using scissors then fold it in half. Fold it in half again to create a quarter circle. Snip the point of the quarter circle off with scissors. Open the quarter circle up to a half circle and line it up on the disk. Draw a line along the fold through the center of the disk. Turn the paper half circle 90˚ and draw another line dividing the disk into quarters.

Decorate: Use masking tape to cover two of quarters diagonal from each other. Use a craft knife to trim away any excess tape and then press the edges firmly to prevent paint bleeding. Spray the surface with spray paint. Add additional coats as necessary and allow to dry completely before proceeding.

Carefully remove the tape.

Drill: Drill a hole at the center of the disk with a drill bit that is at least as big as the shaft of the clock mechanism you will be using.
Install Clock Mechanism: Insert the clock mechanism through the back of the disk and add the hands to the front.

Add a Way to Hang It: Attach a loop of rope to the back of the disk using a hot glue gun.

3. Natural Seagrass

Materials Needed:
- woven placemat
- newsprint or craft paper
- pencil
- scissors
- drill and bit to match clock mechanism shaft
- clock mechanism

Find the Centerpoint: Trace a circle around the placemat on newsprint or craft paper. Cut out the circle using scissors then fold it in half. Then fold it in half again, creating a quarter circle. Snip the point off of the quarter with scissors and open the circle. Line the circle up on the back of the placemat evenly and make a dot in the center hole.

Drill: Drill a hole at the mark with a drill bit that is at least as big as the shaft of the clock mechanism you will be using.

Install Clock Mechanism: Insert the clock mechanism through the back of the disk and add the hands to the front.

4. Natural Stone Tile

Materials Needed:
- natural stone tile
- newsprint or craft paper
- pencil
- scissors
- drill and carbide or diamond bit to match clock mechanism shaft
- water
- clock mechanism

Find the Centerpoint: Trace a square around the tile on newsprint or craft paper. Cut out the circle using scissors then fold it in half. Then fold it in half again, creating a square which is a quarter of the overall square. Snip the point off of the quarter with scissors and open the square.

Line the paper square up on the back of the tile evenly and make a dot in the center hole.

Remove the paper square and place a masking tape X over the center mark. Replace the paper square and make another dot in the center hole on the masking tape. The masking tape will help prevent the drill bit from ‘traveling’ when you begin to drill.

Drill: Use a carbide or diamond drill bit at least as big as the shaft of the clock mechanism you will be using. Use the slowest setting on your drill. For very dense materials it is recommended that you add water while drilling to prevent the drill bit from overheating.
Install Clock Mechanism: Insert the clock mechanism through the back of the disk and add the hands to the front.

5. Dinner Plate

Materials Needed:
- dinner plate or platter
- newsprint or craft paper
- pencil
- scissors
- drill and carbide bit to match clock mechanism shaft
- clock mechanism

Find the Centerpoint: Trace a circle around the plate on newsprint or craft paper. Cut out the circle using scissors then fold it in half. Then fold it in half again, creating a quarter circle. Snip the point off of the quarter with scissors and open the circle. Line the circle up on the back of the plate evenly and make a dot in the center hole.
Remove the paper circle and place a masking tape X over the center mark. Replace the paper circle and make another dot in the center hole on the masking tape. The masking tape will help prevent the drill bit from ‘traveling’ when you begin to drill.

Drill: Use a carbide or diamond drill bit at least as big as the shaft of the clock mechanism you will be using to drill a hole at the center mark. Use the slowest setting on your drill.
Install Clock Mechanism: Insert the clock mechanism through the back of the disk and add the hands to the front.


