


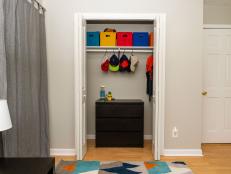
How to Enlarge a Closet Opening
Improve your access with these step-by-step instructions.
When replacing a closet door with a bigger one, make sure the wall isn't load-bearing. If it is, call a professional to install a new header before you install the door.
Here's how to do it yourself:
Materials and Tools:
pre-hung six-panel double doors
7-foot case molding
1 piece sheetrock
1 bag 45-minute spackle
2-by-4-inch studs
220-grit sandpaper
reciprocating saw for demolition
miter box
screw gun
utility knife
straightedge
level
flat crowbar
hammer
goggles
nail gun (optional)
Steps:
- Clear out the closet and cover any furniture to protect from the demolition mess. Pop the doors off the hinges and remove. Use the flat crowbar to remove the door casing and the doorjamb. Be careful not to damage surrounding drywall when pulling off trim.
- Measure for the new doors, marking dimensions on the wall. Make sure the opening has ½-inch on both sides and the top to allow for adjustments.
- Check for electrical and plumbing lines before cutting. Wearing safety goggles, cut and remove drywall in small sections in order to peek into the wall to check for obstructions.
- Use a reciprocating saw to cut any of the framing out of the way.
- Reframe the opening, using 2-by-4 studs on each side of the new opening. Make sure the new 2-by-4's are plumb and level.
- Install the pre-hung door unit. Shim and attach to studs. Put the door in from the outside, tacking it into place with finish nails. Make sure the door is level and centered in the opening. Shim behind each hinge first. Remove one short screw from each hinge and replace with a long screw going through the hinge, the doorjamb, the shim and into the framing.
- After the hinge side is secure, check the top reveal of the door. Make sure the gap is consistent across top, and nail the opposite side (the strike side) of the doorjamb in place.
- Fill in any missing drywall, and screw to studs.
- Finish the sheetrock with three coats of spackle, sanding smooth with 220-grit sandpaper between coats.
- Measure and cut the trim for the sides. Miter the tops of the sides and attach to the wall. Measure for the top trim piece and cut to length. Nail through the top or sides to secure the miter joints.
- Sand the entire trim and remove dust. Stain or paint as desired.
Next Up

How to Organize a Closet: Tips for Clearing Closet Clutter
Learn how to organize your closet like a pro with our strategies for storing clothes, photos and art supplies. Plus, find out how to turn your closet into a home office.

Talk to a Toolman: Q&A With Chip Wade
Should you hire a pro or do that home repair yourself? HGTV Magazine asks Elbow Room’s Chip Wade to weigh in on five common questions.

How to Remove a Stripped Screw
Keep all your projects moving and say goodbye to stripped screws once and for all with these helpful tips and tricks.

How to Whitewash Wood: Whitewashing and Pickling Techniques
Easily brighten and add rustic charm to furniture and a variety of wood surfaces with these budget-friendly whitewashing and pickling techniques.

5 Ways to Prevent Lead Poisoning While Fixing Up a Home
DIYers, beware: Lead-based paint exists in most houses built before 1978. Luckily, the EPA has foolproof tips to prevent lead poisoning while repairing or renovating your home.

The Pros and Cons of Buying a Fixer-Upper, According to The Brownstone Boys
Jordan Slocum and Barry Bordelon, The Brownstone Boys, started a new chapter together in 2018 when the NYC couple decided to purchase a 130-year-old Brooklyn brownstone. They quickly caught the fixer-upper bug and started a blog to document their salvage saga, which later grew into an online community and successful restoration business. Order their new book, For the Love of Renovating: Tips, Tricks & Inspiration for Creating Your Dream Home, find out if a fixer-upper is right for you, and gather inspiration for your next home makeover.

Quick Tips for Home Organization
Try these quick home organization tips for maintaining a clutter-free home from basement to attic.

How to Clean a Washing Machine
Keeping a washing machine clean and well maintained will help keep it working for years to come.

How to Replace a Faucet
Replacing a faucet that's outdated or always dripping is a relatively easy DIY project.
Closet Organization: Easy DIY Closet Shelves
Learn how to build easy and inexpensive custom closet shelves to suit your needs and make the most of your storage space.


