


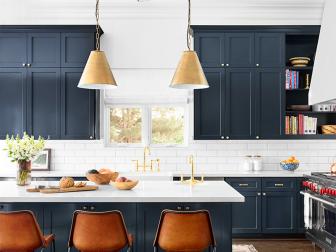
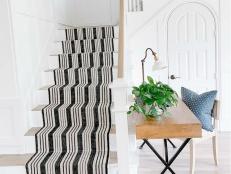
35 Biggest Decorating Mistakes and Solutions 70 Photos
We've enlisted today's hottest interior designers to count down the 35 top decorating mistakes and included their style-saving solutions.
Find Your Design Style


Choose Your Color Palette

More Color Tips and Ideas


Furnish Your Space

More Furniture Tips and Ideas


Accessorize Like a Pro


More Accessory Tips and Ideas


Shop Our Favorite Home Decor

20 Dining Room Rugs for Every Style, Size and Budget Apr 12, 2024
See which type of area rug goes best with your dining table, and shop our favorites.

23 Asian American and Pacific Islander-Owned Home Brands We Love Apr 11, 2024
Support these Asian American and Pacific Islander-owned businesses throughout your home and life.

The Best Spring-Inspired Outdoor Decor on Amazon Mar 28, 2024
Daisies, tulips, bright colors and fresh green accents all evoke feelings of spring. Shop our seasonal outdoor decor picks on Amaz …

The Best Home Finds From the New Diane von Furstenberg Collection at Target Mar 25, 2024
Explore colorful bedding, bath linens, tableware, furniture and more.
The Prettiest Easter Decor Under $100 to Leave Out Through Spring Mar 6, 2024
Embrace the new season with charming decor that celebrates Easter in a chic, not cheesy, way.

28 Adorable Outdoor Easter Decorations Mar 6, 2024
Celebrate the season with too-cute decor we're loving right now.
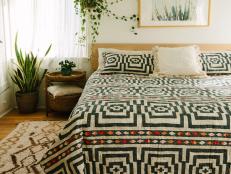
The Best Rugs for Every Room in 2024 Mar 1, 2024
Ground your space in style and function. Bring our know-how underfoot to discover which rugs to put where in your home.

34 Women-Owned and Founded Home Brands We Love Feb 27, 2024
Support women-founded businesses throughout your home and life.

The 20 Best Home Decor Pieces on Amazon That Look Expensive Feb 23, 2024
Shop the best decor finds that all ring in under $200.
The Best Spring Decor Under $50 on Amazon Feb 20, 2024
Ring in the cheeriest season with pastels, fun prints and florals — and our picks all cost less than $50.
15 Fresh Spring Decor Picks for Every Room in Your House Feb 14, 2024
Set the tone for the season ahead with our budget-friendly spring decor finds for your home.
This Amazon Store You've Never Heard of Is Full of Stylish, Perfectly Imperfect Home Goods Feb 5, 2024
Amazon might not be the first place you'd think to shop for hand-blown glass, ceramics, real linen textiles or home decor in gener …

The Best Places to Buy Stylish, Affordable Rugs Online Feb 2, 2024
Snag gorgeous, on-trend area rugs, runners and mats for a fraction of the cost of high-end sites.
29 Black-Owned Home & Lifestyle Brands We Love Jan 31, 2024
Shop with a purpose — today and every day — by supporting these incredible Black-owned home decor brands.

Celebrate Hello Kitty's 50th Anniversary With Pottery Barn's New Heritage Line Jan 17, 2024
Your favorite girl-cat never looked better with these adorable home accessories.

10 Pink Christmas Trees That Bring Barbiecore to Your Holiday Decor Dec 20, 2023
It's your own pink world and we're just living in it.

The Best Outdoor Christmas Lights to Make Your House Merry and Bright Nov 29, 2023
After you've decked your halls and your tree, it's time to take the holiday glow outside. We've rounded up the best sparkle and sh …
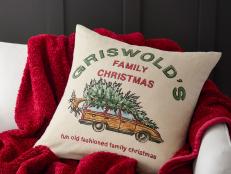
The Best 100+ Christmas Decorations to Buy in 2023 Nov 13, 2023
Make your home extra merry and bright this year with the best Christmas stockings, tree skirts, ornament sets, tabletop accessorie …

The Best Hanukkah Decorations, Gifts and Accessories for 2023 Nov 24, 2023
Decorate and celebrate with gorgeous pieces you'll want to keep for years to come, from modern menorahs to heirloom challah platte …

Brighten Your Yard With the Best Christmas Inflatables Nov 7, 2023
Deck out your lawn this holiday season with the most fun and sure-to-delight Christmas inflatables.

11 American Indian and Alaskan Native-Founded Home Brands We Love Nov 6, 2023
Support these American Indian and Alaskan Native-owned businesses throughout your home and life.
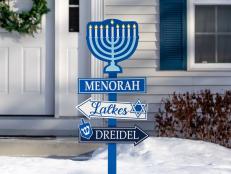
The Best Outdoor Decorations for Hanukkah Nov 3, 2023
Celebrate the Festival of Lights with eye-catching decorations that illuminate and deck out your outdoors in classic blue and whit …

How to Recreate Hilary Farr's Best 'Tough Love' Looks in Your Own Home Oct 31, 2023
Ready for a shopping trip with Hilary? Take a look at some of her coolest home designs from Season 2 of Tough Love With Hilary Far …

15 Beautiful Christmas Tree Skirts Under $100 Oct 27, 2023
Dress your tree to impress with these festive and budget-friendly tree skirt finds.

20 Beautiful Christmas Tree Toppers for Every Style Oct 26, 2023
From classic sparkling stars to a light-up Star Wars Death Star, shop our favorite Christmas tree topper ideas for every budget an …

10 Stylish Pet Beds That Look Like Sofas Sep 15, 2023
Your pup will happily sit (and stay!) on these adorable pet sofas.

19 Ways to Pose a Skeleton for Halloween Oct 4, 2023
No bones about it, these life-size skeleton poses will make your home the most hilarious haunted house on the block this Halloween …
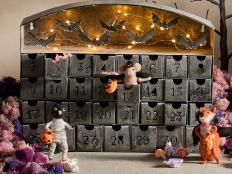
20 Best Halloween Countdown Calendars Sep 20, 2023
The countdown to Halloween is on! Start a fun new tradition with these festive calendars.
42 Outdoor Halloween Decorations to Create the Creepiest Yard on the Block Sep 19, 2023
Get in the spirit and give your neighbors something to talk about with these thrilling Halloween outdoor decorations.