


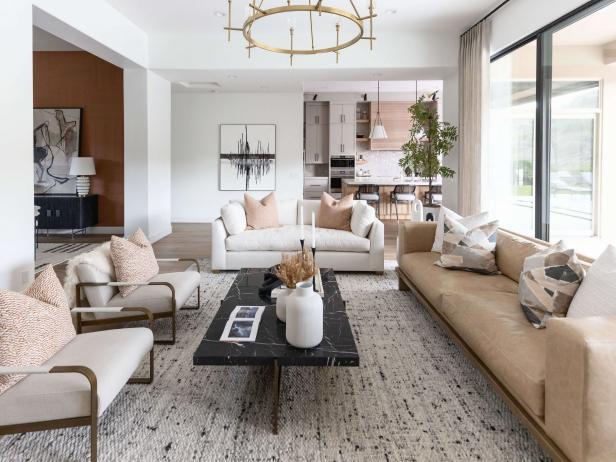
Chic and Contemporary Spin on a Scottsdale Stunner

Glowing Oasis Celebrates Water and Fire Elements

Here’s Our Favorite Mushroom Decor — and How to Use It in Your Home

Mermaid + Blobcore = Jellyfish Aesthetic, and We’re Ready Apr 17, 2024
With wild geometry, deep-sea neon, glistening iridescent finishes and graceful flow, jellyfish-inspired decor is design’s new darl …
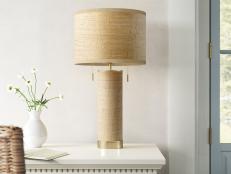
The Best Table Lamps for Every Style in 2024 Feb 28, 2024
Set the mood and make a statement in any room of your house with the help of our hand-picked table lamp finds.
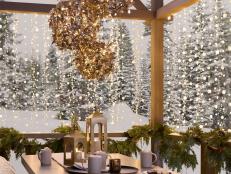
The Best Outdoor Christmas Lights to Make Your House Merry and Bright Nov 29, 2023
After you've decked your halls and your tree, it's time to take the holiday glow outside. We've rounded up the best sparkle and sh …
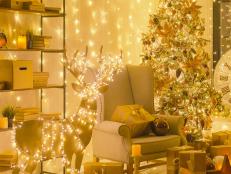
10 Best Indoor Christmas Lights for Every Style and Budget in 2023 Nov 4, 2023
Trim your tree with these top-rated strands.

How to Fix Christmas Tree Lights Oct 27, 2023
Fixing a broken Christmas tree light can be a simple process. Identify the faulty bulb and fix it yourself using these simple tips …

Jenn Todryk’s Budget-Friendly Kitchen Lighting Trick Is So Clever Oct 16, 2023
It's great for renters, takes less than a minute to pull off and gives your kitchen the coziest ambiance.

How to Make a Skeleton Chandelier for Halloween Sep 6, 2023
Learn how to turn a thrifted light fixture into stylish and spooky lighting decor for Halloween.

Chic and Contemporary Spin on a Scottsdale Stunner 25 Photos
Natural wood and polished brass combine with a chic black-and-white palette to create a contemporary interior that is the definiti …

Glowing Oasis Celebrates Water and Fire Elements 10 Photos
With five bodies of water, multiple fire features and state-of-the-art leisure amenities, this outdoor venue was designed to be ov …
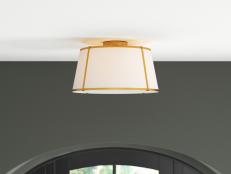
The Best Flush-Mount Light Fixtures for Every Style in 2023 Jul 28, 2023
Bring high style to your low ceilings. Shop these top-rated flush-mount light fixtures for every room in your house.

12 Best LED Strip Lights of 2023 Jul 6, 2023
You know something's good when all of TikTok is raving about it.

The Best Outdoor String Lights for Every Space Jun 14, 2023
Give your backyard or balcony a glow-up with some of our favorite string lighting ideas and product picks.

The Best Ceiling Fans for Every Style and Budget Jun 6, 2023
Whether you're shopping for an outdoor ceiling fan or a low-profile option for your tiny home office, we share our top ceiling fan …

28 Best Bathroom Light Fixtures for Every Style Oct 6, 2023
Brighten your bathroom in style with these must-shop light fixtures.

Shop Interior Designer Katie Zamprioli's Candy-Colored Home May 19, 2023
With power pastels, playful prints and vintage silhouettes, these shoppable rooms are a foolproof recipe for creating your happy p …
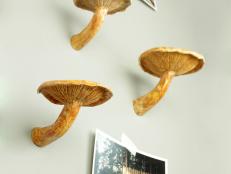
Here’s Our Favorite Mushroom Decor — and How to Use It in Your Home 21 Photos
Mushroom motifs are sprouting up all over the design landscape, and we’ve foraged finds to suit every style. Traditional illustrat …

20 Specialty Bulbs and Statement Lights to Brighten Any Space Jan 12, 2023
These cool bulbs should be exposed! Shop the HGTV Magazine editors' top picks — plus light fixtures that let them shine.
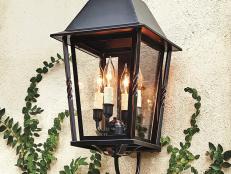
The Best Outdoor Lighting for Every Style Sep 28, 2022
Because traditional wall lanterns have no business illuminating the exterior of a midcentury ranch home.

38 Stylish Outdoor Lighting Ideas 39 Photos
For the backyard or front door, patio, garden or porch, find practical yet unique lighting solutions that work for you.

12 Lighting Trends We Love Right Now Aug 18, 2022
What's old is always made new again. Lighting is no expectation. Shop the latest light fixture trends for 2022 and read about the …

Rustic Retreat Nestled in the Woods 20 Photos
This rustic home, on the Black River, offers serene views from every room, a lush yard and cottage-style kitchen with exposed wood …

Charming Tennessee Country Home 34 Photos
A preferred, muted color palette packs a design punch on this Franklin, Tennessee, farmhouse filled with transitional style and ru …
Drab and Dated Home Transformed into a Light and Airy Dream 34 Photos
Loads of natural light fill this home from floor-to-ceiling windows, highlighting a brand new style in every space. From Craftsman …
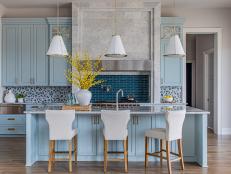
Modern and Elegant French Blue Kitchen 7 Photos
From powder-blue custom cabinetry to graphic geometric subway tile, this handsome kitchen blends traditional tones and materials w …
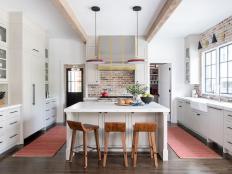
Federal Revival Kitchen With Exposed Brick and Playful Lighting 6 Photos
With a massive barstool-flanked island and an open, welcoming layout, this updated kitchen beckons guests to come on in and stay a …
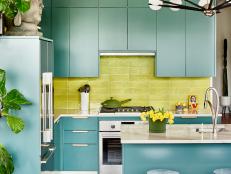
Bold Loft Kitchen With Turquoise Cabinets and Lime Green Subway Tile 8 Photos
This open-plan, contemporary loft kitchen shares space with a massive Buddha and a home that features more than a hundred plants. …

Midcentury Modern Kitchen With Glamorous, Geometric Backsplash 10 Photos
With a stunning vaulted ceiling, a dramatic trio of oversized globe pendants, floating shelves and an artistic array of tiles, thi …
How to Wire a 3-Way Light Switch Jul 7, 2022
Do you want to be able to turn on one light via two different switches, like at the top and bottom of a staircase? Installing a 3- …

Exquisite Texas Estate Greets Guests With a Sculpture in the Center of the Driveway 12 Photos
No stone left unturned, this Texas estate wows from the moment guests enter the circular cobblestone drive and are greeted by the …

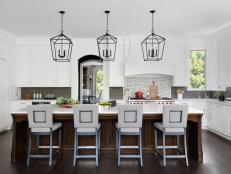
Black and White Kitchen With Rustic + Contemporary Elements 18 Photos
Step inside this Nampa, ID home and explore its luxe black and white kitchen with stunning leather barstools and pops of gold.


